 |
|
Tips & Techniques |
|
Use and Reproduction is Restricted See Copyright Information www.DiamondSure.com |
|
|
|
|
|
Diamond drill speeds vary depending upon the manufacturer and type of diamond drill. DiamondSure Electroplate Bonded Diamond Core Drill Bits, should be used at slow to very slow speeds, with the speed decreasing as the hardness and abrasiveness of the material increases. Also, since the circumference of a bit increases as the bit diameter becomes larger, the drill rpm speed must be reduced on larger bits to offset the increased speed at which the outside cutting edge is moving. The following table shows recommended drill speeds. Drill speeds considerably in excess of these speeds will quickly burn up the diamond bits. Proper drill speeds, low drill pressure and adequate use of water for lubrication will extend drill bit life. |
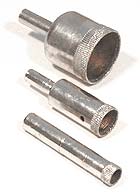
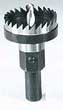
DiamondSure Diamond Core Drill Bits |
Recommended Drill Speed (rpm) |
|||||
|
|
to 1/2" |
to 1" |
to 1-1/2" |
to 2" |
to 2-1/2" |
to 3" |
| Fiberglass |
|
|
|
|
|
|
| Glass, Ceramic & China |
|
|
|
|
|
|
| Limestone & Marble Stone |
|
|
|
|
|
|
| Ceramic Wall Tile |
|
|
|
|
|
|
| Porcelain Wall Tile |
|
|
|
|
|
|
| Porcelain Floor Tile |
|
|
|
|
|
|
| Granite & Quartz Stone |
|
|
|
|
|
|
(Not for use on Concrete or Masonry, or with Hammer Drills)
|
|
Since all materials vary in hardness and abrasiveness, it is impossible to determine exact drill speeds for all possible materials. Additionally, as discussed below, lubrication and drill pressure must also be considered when determining the proper drill speed. A faster drill speed or increased pressure may reduce the cutting time slightly, but it will also increase the friction significantly and heat up the bit, reducing the bit life considerably and increasing the risk of heat fractures and material breakage. If used properly, a diamond drill bit should never be more than warm when touched after use. If a drill bit develops yellow, brown, blue or black 'burn marks' around the tip, it is an indication of extreme heat and that the drill speed being used is too fast, the amount of pressure on the drill is too great, or the amount of water lubrication is completely inadequate. |
|
Water or coolant must always be used to cool and lubricate the tip. The lubrication reduces heat build-up, prolonging drill bit life and helps avoid heat fractures in the material. Water is most often used as the lubricant, since it works very well and has no cost. Oil based lubricants do not work well on diamond drill bits. Good lubrication is critical. Minimal lubrication will keep the bit from burning up, but very good lubrication techniques will extend bit life by a factor of 5 or even 10. When drilling in fiberglass, a diamond drill bit can be used dry or with a very small amount of water. When drilling in glass or ceramic, soft ceramic tile and porcelain, if properly lubricated, the dust from the cut should dissipate into the water. The drill bit contact with the surface should always be wet and the drill bit tip should never be hot. If the tip is ever more than just warm, it is generally an indication of too little lubrication (or possibly too much speed or pressure). When drilling in hard, abrasive materials such as limestone, sandstone, hard ceramic and porcelain tiles, marble or granite, it is critical to have lots of lubrication. With these hard materials, it is common to drill under water or to have a small amount of water constantly running over the drill bit and bore hole. In either case, the "pumping" technique described below is needed to assure water reaches the very tip of the bit. This discussion is presented only as a guide. It is almost impossible to have 'too much' lubrication and the only down side risk is the mess from water being thrown off by the bit. However, 'too little' lubrication will cause many problems. |
|
|
Various kinds of very specialized industrial water feed equipment are available for industrial production type work. But, when drilling with diamond bits, the primary concern is merely getting enough water lubrication on the cutting edge of the bit, no mater what method is used. However, all lubrication methods are not equal. Since good lubrication extends drill bit life considerably, we rated the various methods to help people understand the differences between the various methods. As a rule of thumb, the relative rating also gives a general indication of the relative drill bit life under various lubrication methods. For example, the basic clay dam lubrication method (4 rating) should provide a drill bit life of approximately twice that of using a squirt bottle (2 rating).
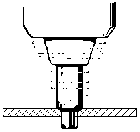
Hose or Water Drip Method: The most basic method is to use a small hose that runs water onto the surface near the hole and down into the bore hole. To provide lubrication on a horizontal surface, one trick is to place a plastic jug or bottle with a small hole near the bottom of it, next to the drill hole. The water leaks out of the bottle and provides continuous lubrication as you drill. To allow lubrication to reach the drill tip, it is very important to use a "pumping" technique described below. Without the pumping technique, the water will not reach the very tip of the drill bit. Clay Dam: Another excellent lubrication technique is to build a "dam" around the drill hole using a small amount of modeling clay or a similar material. This method can be very effective, especially if the water extends above the side tip lubrication hole to allow water to flow into the bit providing good interior lubrication. "Pumping" the drill is also very important to increase the lubrication at the tip. Without the pumping technique, the water will not reach the very tip of the drill bit. The clay can be used many times if it is stored in a plastic zip-lock style bag to keep it from drying out. Pan Drilling: For low volume repetitive work, it is also possible to place the material into a pan or plastic tub (place a thin plastic board underneath so you don't drill into the pan) and fill the pan with water so that it covers the surface of the material being drilled. The water should cover the side lubrication hole on the tip of the diamond drill bit. To allow lubrication to reach the drill tip, it is very important to use a "pumping" technique described below. Without the pumping technique, the water will not reach the very tip of the drill bit even though the bit is under water. Spray Bottle: When drilling on vertical surfaces, about the only way to apply water is to use some type of hose. If that is not possible, a marginally effective solution is to have someone constantly "squirting" water into the bore hole using a squirt bottle. Squirting water will usually keep the bit from burning up, but unless a pumping action is used, the water will not reach the very tip of the drill. Pumping Technique: No matter what lubrication method is used, a periodic "pumping" action will significantly improve lubrication at the drill tip. Because of the pressure on the drill tip, water has trouble reaching the very tip of the drill bit. A "pumping" technique allows lubrication to reach the very tip. While drilling, merely raise the drill up and down a fraction of an inch once in a while as you drill (maybe every 15 to 20 seconds or so). This assures that water enters the drill tip area completely and fully lubricates the very tip. Pumping the drill improves lubrication at the tip and will improve drill bit life considerably. |
|
When using normal drill bits on soft materials such as wood, increasing the pressure causes the bit to drill faster and has little affect upon friction or heat build-up on the bit. When drilling in harder materials such as hardwoods, it is more important to reduce the pressure and let the bit "drill at its own speed". Otherwise, friction will quickly burn up the bit. When using diamond drill bits, the affect is similar to hardwood drilling, but it is magnified many times due to the extreme hardness and abrasiveness of the material being drilled. When using diamond drills, it is very important to have only light to medium pressure on the drill and to let the bit "drill at its own speed". Increasing pressure will not speed up the cutting noticeably, but it will increase the friction considerably and quickly cause the bit to overheat. This not only burns up the bit, but it also heats up the surrounding surface and can cause heat fractures or breakage to occur.
If a drill bit develops yellow, brown, blue or black 'burn marks' around the tip, it is an indication of extreme heat caused by the excessive drill speed or by too much pressure on the drill. Impact type "hammer drills" should never be used with diamond drills as they have no benefit and will cause the tip of the bit to mushroom or split. If a hole is being drilled completely through a piece of fragile material, it is also important to "lighten up" considerably on the pressure when the drill bit is near the back of the material. This reduces chipping or fracturing on the back of the material when the bit emerges from the back. |
|
Drill Speed, Pressure and Lubrication The cutting speed and life of a diamond drill bit are affected by the hardness and abrasiveness of the material plus the drill speed, pressure and lubrication. Experience with a specific material quickly allows a person to determine the optimum drill speed, pressure and lubrication to obtain the fastest cutting speed with the least affect upon bit life and risk of heat fractures or breakage. However, when experience is lacking, it is best to start out with a very slow drill speed, very low pressure and lots of lubrication. This starting point reduces risks to a minimum and extends bit life considerably. |
|
|
Pilot bits are often seen on standard metal core drill bits or hole saws designed for use on wood and other soft materials. A pilot bit is a small drill bit located in the center of the hollow core drill bit, that keeps the bit centered while starting a hole. Pilot bits are especially convenient when using a core drill bit in a hand drill. When a pilot bit is not present, a core drill bit may tend to "walk" until it seats into a groove. However, pilot bits are rarely used on diamond core drill bits since there are many drawbacks of a pilot bit with the diamond core drill bit design and drilling in very hard materials.
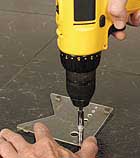
A template can easily be used to start a core drill that does not have a pilot bit. This simple technique is discussed in the following section. |
|
|
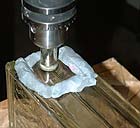
Core drill bits above 1/2" work best when used in a drill press rather than in a hand drill. Starting a core drill bit when using a drill press is simple, since the drill press keeps the drill bit from moving about. To reduce drill bit slippage or "walking" when using a hand drill, a template can be made to help start the drill bit if necessary. A template is made by drilling a pilot hole in a piece of soft wood or plastic, using the diamond core drill bit or by cutting a "V" in the edge of a piece of wood or plastic or drilling a hole in it the size of the core drill. The hole template works best, however, the "V" template is easier to make and can be used with many sizes of core drill bits. Templates are often made of 1/8" plexiglass, 1/8" pressed wood or even cardboard. For repetitive drilling, a plastic or plexiglass template works best since water lubrication can be used immediately. The template is placed on the surface of the material being drilled, with the pilot hole or "V" above the target hole area. The template will hold the core drill bit in place as it starts. After just a few revolutions of the drill bit, a groove is created and the template can be removed. |
|
Tempered glass can be drilled, however, breakage may run as high as 80% to 90% depending upon the degree of temper in the glass. We do not recommend trying to drill tempered glass. The manufacturing process of making tempered glass results in the glass having a large amount of stress between various portions of the glass. The stress points might look much like a piece of wood containing lots of "knots", however, there is no outward appearance to indicate the hidden stress. Highly tempered glass will often crack at the stress points near the hole. Since the amount of hidden stress increases with the degree of temper, the success rate of drilling tempered glass reduces with the increase in glass temper. There is no way to know the amount of temper in a piece of tempered glass, so there is no way to evaluate the amount of risk involved in trying to drill it. Therefore, we DO NOT RECOMMEND attempting to drill tempered glass. |
|
Bonded diamond core drill bits are designed to drill to depths of about 1/2". We do not recommend drilling in materials beyond that depth. However, it is often possible to push the bits beyond their design limits by drilling to a depth of about 1/2", then removing the core before drilling deeper. The core can usually be removed easily on smaller holes by slipping a screwdriver down the drill slot and twisting. On larger holes, you may need to chip out the center core 'plug' with a chisel before continuing to drill. Removing the core reduces friction and heat build-up caused by the 'plug' and will usually allow drilling deeper holes if extremely good lubrication is used. Drilling deep holes with bonded diamond drill bits is generally limited to about 1-1/4" in depth depending upon the specific material being drilled. Even when removing the core periodically and using very good drilling techniques, the friction still increases considerably and limits deep boring. For deeper holes, a sintered diamond drill bit is normally required. The more expensive sintered bits have diamonds embedded directly into the metal tip and are most appropriate for deep drilling. |
(not completely through the material) |
|
|
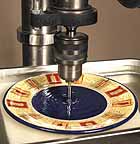
Ceramic and Porcelain tile, used on walls, counters and floors, has changed considerably over the years. Ceramic tile was first developed with a heat-hardened vitrified glass finish on the top surface. The inside of the Ceramic tile was still relatively soft. Since the tile was easily scratched, manufacturers developed better manufacturing techniques to make the surface finish much harder. The newer Ceramic tile now has an extremely hard surface that wears very well and the inside of the tile is also relatively hard. While this is a distinct advantage from the stand point of wear, the newer Ceramic tile is often difficult to drill without a diamond drill bit. Porcelain tile was originally developed as an alternative to Ceramic tile, for use in floor applications where usage and wear was more extreme. Porcelain tile is made with various mixtures of materials, normally including feldspar and quartz, which are two of the major components of natural Granite. The use of Porcelain floor tile was generally limited to commercial applications, but by the late 1980's, Porcelain tile use expanded more into residential construction. In the 1990's, tile manufacturers began to expand their Porcelain tile product lines to include many different styles and many that closely resembled natural stones. Because of the natural stone look, Porcelain tile use on walls and counters became more popular. Finally, in the late 1990's tile manufacturer's developed new manufacturing techniques that made the Porcelain tile significantly harder. As with Ceramic tile, this was a major advancement resulting in reduced wear and very long life. However, many Porcelain tiles are now as hard as Granite and some are as hard as a low grade tool steel. The newer type of high-quality, "super-hard", "Class IV" and "Class V" Porcelain tiles are now almost impossible to drill with the older "spear point" carbide drill bits and generally can only be drilled with a diamond drill bit.
When drilling in the newer super-hard tile, using a diamond drill bit is the only reasonable option. However, even with a diamond drill bit, the extremely hard material is not very forgiving if inappropriate drilling techniques are used. It is important that good drilling techniques be used. Appropriate drill speeds, low drill pressure and good lubrication are critical. Please review the Lubrication Tip & Techniques and the DiamondSure Drill Speed sections. |
|
|
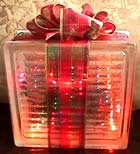
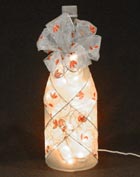
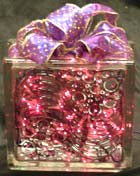
Drilling in glass block or bottles is basically no different than drilling in normal glass. If you use the appropriate speed, use low drill pressure and plenty of water for lubrication, you won't have any problems. Glass breakage with carbide bits is fairly common, but with a good diamond bit, it is extremely rare. There are a few very important facts and tips that will helpful when drilling glass block or bottles. There are numerous different types and styles of glass block made by many different manufacturers. Most have some type of design or pattern, however, for drilling purposes, there are two important characteristics to be aware of. Glass block can vary significantly as to the thickness of the glass wall and some glass block is tempered. This information is rarely disclosed on the block itself, but should be considered when buying glass block for crafting purposes. If you are drilling glass block that has been installed in a wall, you don't have much choice but to drill whatever is there. However, for craft projects, it is good to be selective. If the glass block is 3/8" thick, it will take three times as long to drill compared to block with a 1/8" thick wall. Additionally, it will triple the drill bit wear per hole, causing the bit life to be only one-third as long. Some glass block and bottles are tempered to increase the strength of the glass. Tempered glass should be avoided if reasonably possible. Experienced crafters who work with glass block and bottles learn to search for different types and styles to test. After drilling a sample of each, it is obvious which has a thin wall and if any are tempered. Also, crafters who are drilling lots of glass blocks or bottles, normally develop some type of "clay dam" or pan drilling method, so that it can be drilled under water to improve lubrication and extend drill bit life. The "clay dam" method of lubrication is very effective for drilling in glass block and is simple to use. Under water pan drilling works best for bottles. "Pumping" the drill is also very important since even under water, the tip of the bit will go dry after drilling about 1/8" deep. Water lubrication techniques are discussed in more detail in the Lubrication Tips & Tricks section. Glass block normally has a vacuum
inside. Some of the water and glass dust will always be
sucked inside when the hole breaks through. However, it
is easy to rinse out the inside of the block with water as long
as the dirty water inside is not allowed to dry out. The
plug from the hole will sometimes be pulled into the block -
it will usually drop out easily when the inside is rinsed.
However, if too much pressure was placed on the drill as the
hole breaks through, it can cause the plug to have a flair from
the splintering on the rear of the hole. Normally, you
can remove the plug with a pair of needle nose pliers, but the
best solution is to reduce the drill pressure when nearing the
back of the glass to avoid splintering as the drill breaks through. A piece of wire from a regular coat hanger or a small wooden dowel work great for inserting into the hole to "push" the lights around inside the block, so that all the corners are filled with lights. A hand drill works fine using a starting template and a clay dam - for a few glass blocks. However, an inexpensive drill press is well worth the cost if you are making lots of blocks. There are many very nice, inexpensive drill presses available these days and they make glass block drilling fast and easy compared to a hand drill. The most popular diamond drill bit for glass block drilling seems to be the 1/2" size since it is about the right size for light strings. We prefer a 5/8" sized bit because the slightly larger hole gives a little extra room when inserting the lights or when pushing them around and allows easy removal of the lights if you change your mind or need to change a bulb. Glass blocks sometimes have a white or cream paint coating around the outside edge to give better adhesion for building mortar or caulk. Most people remove the paint, but some just hide it under a ribbon. If the paint is hard to remove, soaking the block in hot water usually softens the paint and allows easy removal with a common kitchen dish scratcher. Glass blocks come in many sizes, shapes and surface textures. The ones with a heavy surface textures tend to work best since they diffuse the light and hide the light string wires better. Our research has shown that there are at least 15 different surface textures available (there are probably far more), so a little searching can result in finding some unusual patterns that make very nice light blocks. Most people seem to use the standard 8"x8"x3" blocks, maybe because they are easily available. We have found that the smaller 6"x6"x3" blocks and even some of the odd shaped triangular, brick shaped and corner blocks are are also especially nice because of their unique sizes and shapes. There are no limits to the artistic possibilities, so don't be afraid to try something different. A hot glue gun with clear glue works very well to attach ribbons and bows, or ribbons can be tied as if you were wrapping a package. Most people tend to start out with the multi-colored lights then quickly learn that the white and single colored lights are also beautiful. The non-multi colored lights are especially nice for light blocks that can be used all year round. Light strings also come with various colored wire, so experiment with the white lights with white wire or the red lights with red wire, etc to see what you like. Finally, if you ever get a chance to try the "LED" or "Tiny Lights", give them a try - especially the big strings of 60 or 100 (it takes a few more lights because they are so small). Yes, they cost more, but they create almost no heat and bulbs last nearly forever. Most importantly, some LED light strings have a light function controller that gives a special random blinking pattern that blinks, twinkles and strobes, etc. If you can find the type with the light controller, the LED strings with the special lighting affect is really worth the additional cost. Our experience is that most people who try the LED lights with the controllers rarely go back to the standard bulb lights. |
|
Aquariums are often drilled to allow for installation of side-entry filter systems rather that standard top-mount systems. The side-entry systems provide better flow-through water movement where that is an important factor. Drilling in aquariums is not difficult - it is basically the same as drilling normal glass. However, additional precaution should be taken when drilling aquariums compared to normal glass. There is always a small risk of causing a break when drilling any glass. While the risk is extremely small if proper drilling techniques are used, this small risk is always there. If a break would occur when drilling in regular glass, it is frustrating, but not a major loss. However, the loss of an aquarium is much more significant, so reasonable care should be taken. As additional 'comfort', we offer that the structural integrity of glass increases significantly as it becomes thicker. So, the small risk of a drilling problem actually reduces significantly as the size (and cost) of the aquarium increases. Based upon our testing and our customer contact, we offer the following suggestions for aquarium drilling. Take proper care: You don't need to be an expert at drilling glass or aquariums. No matter if it is a 20 gallon tank or 2,000 gallons. Take your time, use proper drilling speeds, low drill pressure, good water lubrication and follow a few basic cautions relative to aquarium drilling. Be sure you have the right sized drill bit: Pipe is measured as an inside diameter. So 1-1/2" pipe or a 1-1/2" fitting will have an 'inside diameter' of 1-1/2". However, the outside diameter can vary depending upon the type of pipe or fitting used and depending upon the specific manufacturer. Be sure to measure the outside diameter properly so that you drill the correct size hole. This may sound rather basic, but we assure you that it is a common mistake. Avoid drilling in the bottom of the tank: The bottom of a tank is often tempered glass, but it is extremely rare for the sides to be tempered. Additionally, the water weight on the bottom is significantly higher than on the sides of a tank. Anytime glass is cut or drilled, micro fractures always occur along the cut, and the hole reduces the structural strength of the glass. While tanks are generally "over engineered" to be much stronger than actually needed for their capacity, the bottom is the "weakest link" and should generally be avoided. Drill at least 1" from the sides of the glass: All glass contains minor imperfections and flaws. Micro fractures also occur along the edge of glass when it is cut. To avoid placing any additional stress on those weak spots, we recommend staying at least 1" away from any glass edge. Use proper lubrication techniques: Basic lubrication techniques are discussed above in Lubrication Tips & Techniques <Click Here>. The best lubrication method for tank drilling is to position the surface horizontally and use a dam made of clay or similar material around the drill area. The method as discussed in the above section, is very simple and also very effective. If a large stationary tank is being drilled in the vertical position, use the 'spray method' and take care to get as much of the spray into the drill slot as possible. Assure adequate lubrication: While drilling, it helps to raise the drill up and down a fraction of an inch once in a while as you drill (about every minute or so). This merely assures that water enters the drill hole completely and fully lubricates the very tip of the bit . This "pumping" technique is especially helpful when drilling larger tanks with thick walls. Ease off when you are nearly through: As a drill breaks through the back side of any material, it will cause some splintering. Due to the brittle fragile nature of glass and your desire to retain structural integrity, you want to minimize the splintering. Merely reduce the drill pressure as you near the back of the glass. This is one of those rare instances where time is your friend. If it takes you 3 minutes to drill 75% of the way through, back off and use another 3 minutes to go most of the the the remaining 25%. The final 1/32" to 1/16" is the most delicate, so again take your time and ease up on the pressure. If your hole ends up being a little too tight: You don't want the hole to be any larger than you actually need, but sometimes people cut it a little too close. Since the pipe fittings are normally plastic, an easy solution is to use fine sand paper to reduce the outside diameter of the fitting slightly. If your hole is a little too large, the gasket on the fitting normally provides extra room and should provide an adequate seal. Finally: Drilling holes in any glass reduces the structural integrity of the glass and will reduce the safety levels that were intentionally engineered into an aquarium. We must specifically state that in offering these tips and techniques, we do not accept any liability and disclaim any express or implied warranties and all incidental or consequential damages should problems arise from using our products for drilling aquariums. |
|
The life span of all types of drill bits is affected by the hardness and abrasiveness of the material being drilled, the thickness of the material, plus the speed of the power drill, the amount of pressure used and the use of adequate lubrication. The hardness and abrasiveness of materials can vary significantly. Even materials which appear similar have varying degrees of hardness and abrasiveness. Each individual's drill speed, pressure and amount of lubrication also varies significantly. As a result it is nearly impossible to estimate the life of a diamond bit. For example: On standard 1/8" glass, an electroplated diamond bit may last for 200 to 300 holes, or more, depending upon the specific glass and specific drilling techniques used. Drilling in 1/4" glass, being twice as thick, will normally produce only half as many holes over a drill bit's life, if the glass hardness and drilling techniques are the same. Lubrication has a significant affect upon drill bit life. Using a good water lubrication method can double or triple drill bit life. The effectiveness of various lubrication methods are discussed in the lubrication techniques section. On the extremely hard and abrasive materials, such as granite or the newer "super-hard" porcelain floor tiles, a diamond bit may only produce 8 to 15 holes in 3/8" material. However, the same bit may produce as many as 20 or more holes, all depending upon the specific material, the thickness and the specific drilling techniques used. Tests on some of the less hard, class III floor tiles have ranged from 40 to 60 holes. Porcelain wall tile can have bit lives of from 8 to 60 holes or more, depending upon the exact material while ceramic wall tile can easily result in hundreds of holes depending upon the hardness. These examples are are all based upon extensive testing in different materials using proper drill speeds, drill head pressure, and lubrication. Test results were much less, using poor drilling techniques, and extreme tests using improper drilling techniques often resulted in a bit "burning up" after only one or two holes. |
|
Copyright DiamondSure 1998-2015 Use and Reproduction is Restricted See Copyright Information www.DiamondSure.com |
|
|
||||
|
Site Index | Contact Us | Privacy . |
|||||